

Buying property in the UAE is exciting, but don’t let that excitement blind you to potential issues. A snagging checklist UAE buyers can rely on helps you spot defects before final handover – saving thousands in repairs and endless headaches down the road.
This guide is designed for first-time buyers, seasoned investors, and anyone purchasing off-plan or newly constructed properties in Dubai, Abu Dhabi, and across the Emirates. You’ll get a complete inspection framework that covers everything from obvious cosmetic flaws to hidden structural problems.
We’ll walk you through the essential exterior and interior inspection points you need to check, plus give you kitchen and bathroom-specific checkpoints that developers often overlook. You’ll also learn the proper documentation process and how to communicate effectively with your developer to get issues resolved quickly.
Understanding Property Snagging in the UAE Market

What Property Snagging Means for New Homeowners
Property snagging represents the final quality control step before you officially take ownership of your new home in the UAE. Think of it as your last chance to catch construction defects, incomplete work, and quality issues while the developer is still legally responsible for fixing them. This critical inspection process happens during the handover period, typically 7-14 days before you receive your keys.
The UAE’s booming construction industry produces thousands of new residential units annually, from luxury villas in Dubai Hills to affordable apartments in Sharjah. While most developers maintain high standards, the fast-paced construction environment can lead to oversights. These range from minor cosmetic issues like paint scratches to major problems such as plumbing leaks or electrical faults.
A professional snagging checklist UAE buyers use covers everything from structural integrity to finishing touches. You’ll examine walls for cracks, test all electrical outlets, check plumbing fixtures, inspect doors and windows, and verify that all promised amenities function properly. The goal isn’t to nitpick but to ensure you receive the quality home you paid for.
Many first-time buyers in the UAE skip this crucial step, assuming their brand-new property will be perfect. This assumption often leads to expensive repairs later when warranty periods expire. Snagging protects your investment by identifying issues while they remain the developer’s responsibility to fix.
The process typically involves creating a detailed list of defects, photographing each issue, and submitting a comprehensive report to the developer. Most reputable developers in Dubai, Abu Dhabi, and other emirates expect snagging reports and have established procedures for addressing identified problems.
Legal Rights and Developer Obligations in UAE
UAE property law strongly favors buyers when it comes to construction defects discovered during the handover period. The Dubai Land Department and other regulatory bodies require developers to deliver properties that match the specifications outlined in the sales agreement. This creates a legally binding obligation to remedy any defects identified during snagging.
Your purchase agreement typically includes a defects liability period, usually lasting 12 months for minor issues and up to 10 years for structural problems. During this time, developers must address legitimate defects at no cost to you. The Real Estate Regulatory Agency (RERA) in Dubai and similar authorities in other emirates enforce these obligations.
The Consumer Protection Law in the UAE also provides additional safeguards. If a developer fails to address snagging issues within reasonable timeframes, you can escalate the matter to relevant authorities or pursue legal remedies. This includes potential compensation for temporary accommodation if defects make your property uninhabitable.
Key legal protections include:
- Warranty Coverage: Developers must provide warranties covering structural defects, mechanical systems, and finishing materials
- Completion Standards: Properties must meet building codes and match approved architectural plans
- Timeline Requirements: Developers typically have 30-60 days to address snagging items after receiving your report
- Quality Assurance: All work must meet UAE building standards and international quality benchmarks
The UAE’s regulatory framework requires developers to maintain quality standards throughout the construction process. Building permits include detailed specifications that contractors must follow. When your snagging inspection reveals deviations from these approved plans, you have solid legal grounds to demand corrections.
Recent amendments to property laws have strengthened buyer protections. The Strata Law in Dubai, for example, gives homeowners’ associations more power to hold developers accountable for common area defects. Similar regulations in Abu Dhabi and other emirates provide comparable protections.
Common Construction Issues in UAE Properties
The UAE’s unique climate and rapid construction pace create specific challenges that frequently appear during snagging inspections. Understanding these common issues helps you know what to look for when examining your new property.
Climate-Related Problems
The harsh desert environment affects construction materials and techniques in ways that might surprise buyers from cooler climates. Extreme heat causes materials to expand and contract dramatically, leading to cracks in walls, ceilings, and around windows. High humidity levels, especially near coastal areas like Dubai Marina or Abu Dhabi’s Corniche, can cause paint to bubble and metal fixtures to corrode prematurely.
Air conditioning systems face particular challenges in the UAE. Units must work overtime to maintain comfortable temperatures, leading to frequent breakdowns if not properly installed. Common AC-related snagging issues include inadequate cooling capacity, poor ductwork installation, and insufficient insulation around units.
Water-Related Defects
Despite the arid climate, water damage ranks among the most common snagging issues in UAE properties. Poorly sealed bathrooms and kitchens can develop leaks that damage neighboring units. Balcony drainage systems often fail to handle the intense rainfall during occasional storms, leading to flooding and water damage.
Swimming pools and water features require special attention. Improper waterproofing can cause structural damage and create safety hazards. Pool equipment rooms need adequate ventilation to prevent humidity damage to electrical systems.
Finishing and Cosmetic Issues
The speed of construction in major UAE developments sometimes compromises finishing quality. Paint application problems include uneven coverage, brush marks, and color inconsistencies. Tile work may show lippage (uneven edges), grout inconsistencies, or poor alignment.
Kitchen and bathroom installations frequently reveal issues during snagging. Cabinet doors may not align properly, countertops might have chips or scratches, and fixtures could be incorrectly installed. These problems seem minor but can significantly impact your daily living experience.
Electrical and Mechanical Systems
Power systems in UAE properties must handle significant loads from air conditioning and other equipment. Common electrical issues include:
- Outlets not working or improperly wired
- Light fixtures installed incorrectly or with wrong bulb types
- Circuit breakers tripping frequently due to overloading
- HVAC controls not functioning as designed
- Smart home features not properly configured
Structural Concerns
While major structural problems are less common with reputable developers, they do occur. Cracks in walls or ceilings might indicate settling issues or construction defects. Door and window frames that don’t close properly could signal foundation or framing problems.
Balcony railings and safety features require careful inspection for proper installation and compliance with safety codes. Glass barriers must meet specific strength requirements to withstand wind loads common in high-rise buildings.
Cost Savings from Early Problem Detection
Identifying construction defects during the snagging phase can save UAE property buyers thousands of dirhams in future repair costs. The financial benefits extend beyond immediate savings to long-term property value protection and reduced maintenance expenses.
Immediate Financial Benefits
When you catch defects during snagging, repairs remain the developer’s responsibility at no cost to you. A simple paint touch-up that costs AED 500 if done by the developer becomes your expense after handover. Multiply this across dozens of potential issues, and savings quickly add up to thousands of dirhams.
Major system problems discovered early prevent catastrophic failures later. A properly functioning AC unit identified as undersized during snagging gets replaced under warranty. The same unit failing after two years could cost AED 15,000-25,000 to replace, plus temporary accommodation expenses while repairs are completed.
Preventing Escalation Costs
Small problems often grow into expensive repairs if left unaddressed. A minor plumbing leak behind a wall might cause AED 200 in water damage initially. Left unchecked, the same leak could result in AED 20,000 worth of damage including mold remediation, structural repairs, and complete bathroom renovation.
Electrical issues present similar escalation risks. A loose connection that causes occasional power fluctuations might seem minor but could damage expensive appliances or create fire hazards. Early detection and repair prevent these costly consequences.
Long-Term Value Protection
Properties with documented snagging reports and completed repairs typically maintain higher resale values. Buyers in the UAE secondary market increasingly request snagging documentation as proof of proper maintenance and quality assurance. This trend particularly affects luxury developments where buyers expect meticulous attention to detail.
Well-maintained properties also command higher rental yields. Tenants pay premium rates for homes without maintenance issues, and property management becomes simpler when all systems function properly from day one.
Insurance and Warranty Benefits
Comprehensive snagging documentation helps with insurance claims if problems develop later. Insurance companies view thorough initial inspections favorably, potentially reducing claim disputes and processing times. Some insurers offer premium discounts for properties with completed professional snagging reports.
Warranty claims also benefit from early documentation. Manufacturers honor warranties more readily when defects are documented immediately upon discovery. This documentation creates a clear timeline showing problems existed from installation rather than developing through misuse or neglect.
Comparative Cost Analysis
| Issue Type | Developer Cost (Snagging) | Owner Cost (Post-Handover) | Potential Savings |
|---|---|---|---|
| Paint Touch-ups | AED 0 | AED 2,000-5,000 | AED 2,000-5,000 |
| Plumbing Repairs | AED 0 | AED 3,000-8,000 | AED 3,000-8,000 |
| Electrical Fixes | AED 0 | AED 1,500-10,000 | AED 1,500-10,000 |
| AC System Issues | AED 0 | AED 5,000-25,000 | AED 5,000-25,000 |
| Flooring Problems | AED 0 | AED 8,000-20,000 | AED 8,000-20,000 |
Time Value Considerations
Beyond direct cost savings, early problem detection saves valuable time. Coordinating repairs with developers during handover is more efficient than managing multiple contractors later. You avoid the hassle of living with defects while arranging repairs, and your move-in process proceeds smoothly without interruption.
The convenience factor has monetary value too. Taking time off work to supervise repairs, temporary relocation costs, and stress-related expenses all add to the true cost of deferred maintenance. Proper snagging eliminates these hidden costs by ensuring your home is truly move-in ready.
Essential Exterior Inspection Points
Building Facade and Structural Integrity Checks
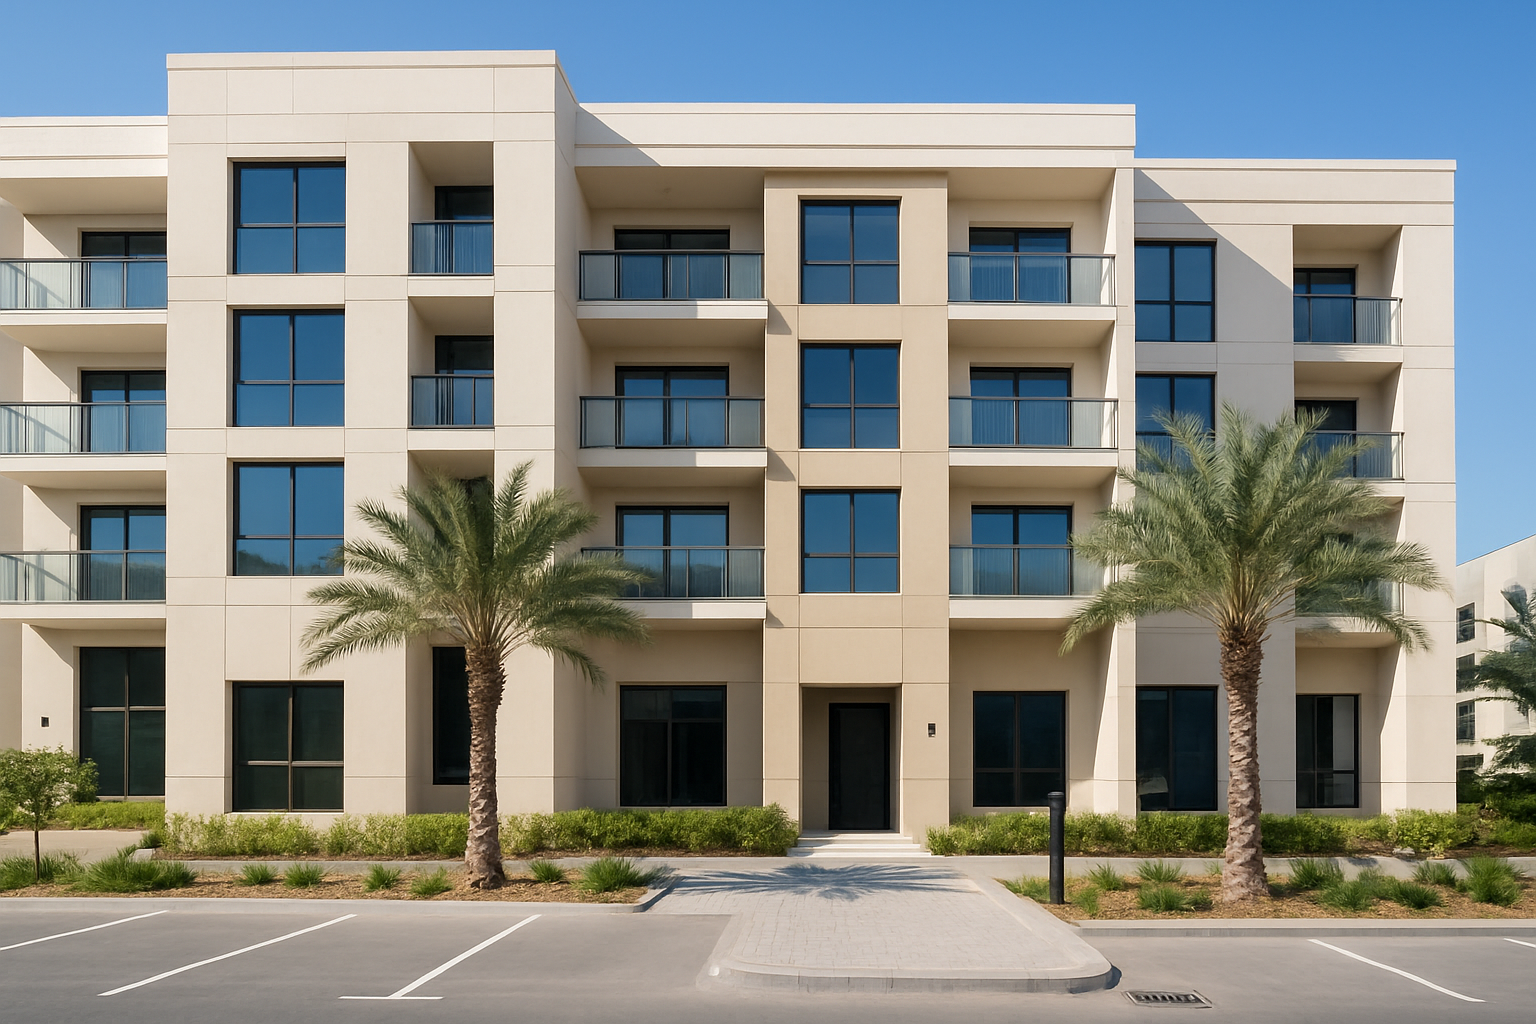
The exterior facade serves as your property’s first line of defense against Dubai’s harsh climate conditions. Start your inspection by examining the building’s external walls for any visible cracks, especially around windows and door frames where stress concentrations typically occur. These cracks might seem minor, but they can lead to significant water infiltration during the occasional heavy rainfall that hits the UAE.
Pay close attention to the alignment of building elements. Walls should appear straight and plumb, with consistent spacing between building joints. Look for any signs of settling or movement in the structure, which often manifest as stepped cracks following the mortar lines in masonry work or diagonal cracks in concrete surfaces.
The building’s cladding system requires thorough examination. Many UAE developments feature modern cladding materials like aluminum composite panels, natural stone, or ceramic tiles. Check for loose or missing panels, gaps between cladding elements, and proper sealing at joints. These gaps can allow moisture penetration and create thermal bridges that affect your property’s energy efficiency.
Inspect the building’s expansion joints, particularly important in the UAE’s extreme temperature variations. These joints should be properly sealed with appropriate materials that can handle thermal movement. Missing or damaged sealant in expansion joints can lead to water ingress and structural damage over time.
The foundation area deserves special attention. Look for any signs of water staining, efflorescence (white chalky deposits), or vegetation growth near the foundation walls. These indicators often point to drainage issues or poor waterproofing that could affect the building’s long-term stability.
Check the building’s architectural features like decorative elements, cornices, and parapets. These elements should be securely attached and properly detailed to shed water away from the building. Loose architectural features pose safety risks and can cause damage to lower building elements if they detach.
Balcony Safety and Waterproofing Assessment
Balconies face some of the harshest conditions in UAE properties, subjected to intense sun, occasional heavy rains, and sandstorms. Your snagging checklist UAE inspection should begin with the balcony’s structural integrity. Check the balcony slab for any visible cracks, spalling concrete, or exposed reinforcement bars. These issues can compromise both safety and durability.
The waterproofing membrane on balcony floors requires careful examination. Look for any bubbling, cracking, or peeling of the waterproof coating. Test the drainage by pouring water on different areas of the balcony floor – water should flow freely toward the drainage points without pooling. Standing water on balconies can penetrate the waterproofing system and cause serious damage to the structure below.
Inspect the balcony drainage system thoroughly. Drains should be clear of debris and properly connected to the building’s drainage system. Check that drain covers are secure and appropriately sized to prevent clogging. The floor should have adequate slope (typically 1-2%) toward the drainage points.
Balcony railings demand special attention for safety reasons. Test the stability of railings by applying gentle pressure – they should feel solid and secure. Check that railing heights meet UAE building code requirements (typically 1.1 meters minimum). Examine the connection points between railings and the balcony structure, looking for any signs of looseness or corrosion.
The junction between the balcony and the interior space needs proper weather sealing. Check the door threshold and surrounding areas for appropriate weatherstripping and sealant. This area is particularly vulnerable to water infiltration during heavy rains.
Glass balustrades, common in modern UAE developments, require specific inspection points. Look for any chips, cracks, or scratches in the glass panels. Check that the glass is properly seated in its frame with adequate support and that all safety films or treatments are intact.
Window and Door Frame Installation Quality
Windows and doors represent critical elements in your property’s thermal envelope and security system. Begin by checking the squareness and alignment of all window and door frames. Use a level to verify that frames are properly plumb and level – misaligned frames can prevent proper operation and create air leakage paths.
Test the operation of all windows and doors multiple times. They should open and close smoothly without binding, sticking, or requiring excessive force. Pay attention to any unusual noises during operation, which might indicate hardware problems or frame distortion.
Examine the weather sealing around all window and door frames. The sealant should be continuous, properly adhered, and free from gaps or cracks. Poor sealing allows conditioned air to escape, increasing your energy costs significantly in the UAE’s climate.
Check the installation of window and door hardware. Locks should engage properly and feel secure. Handles should operate smoothly without wobbling or binding. Window stays and restrictor mechanisms should function correctly and hold windows in the desired position.
The glazing system requires careful inspection. Look for any cracked or damaged glass panels, but also check for proper glazing bead installation and adequate edge bite (the amount of glass supported by the frame). Double-glazed units should be free from condensation between panes, which indicates seal failure.
Inspect the interface between frames and the building structure. The connection should be properly flashed and sealed to prevent water infiltration. Look for any signs of water staining or damage around frame perimeters, which could indicate installation defects.
Sliding doors and windows need special attention to their track systems. Tracks should be clean, properly aligned, and free from debris. Test the smooth operation of sliding elements and check that they lock securely in the closed position.
Screen installation, while not always standard in UAE properties, should be checked where present. Screens should fit properly in their frames without gaps and operate smoothly without binding or sagging.
Parking and Common Area Condition Review
The parking area condition directly affects your daily experience and property value. Start by examining the parking surface for any cracks, potholes, or uneven areas that could damage vehicles or create safety hazards. The surface should have proper drainage to prevent water accumulation during rare but intense rainfall events in the UAE.
Check the parking space markings and numbering system. Lines should be clearly visible and properly positioned to allow adequate space for vehicle maneuvering. Verify that your designated parking spaces match the dimensions specified in your purchase agreement and meet local standards for parking space sizes.
Lighting in parking areas requires thorough assessment for both security and safety reasons. All light fixtures should be operational, providing adequate illumination throughout the parking area. Check for any dark spots or areas with insufficient lighting that could pose security risks.
Ventilation systems in covered or underground parking areas need inspection. Mechanical ventilation should operate properly to prevent carbon monoxide buildup and maintain air quality. Check that ventilation grilles are clean and unobstructed.
The structural elements of parking areas, including columns, beams, and walls, should be examined for any signs of damage, cracking, or deterioration. Pay particular attention to areas where vehicles might have impacted structural elements.
Common area inspection extends beyond parking to include lobbies, corridors, and shared facilities. Flooring materials should be properly installed without loose tiles, carpet wrinkles, or other trip hazards. Check that floor transitions between different materials are smooth and properly finished.
Wall finishes in common areas should be examined for quality and completeness. Look for any damaged areas, color variations, or incomplete work. Paint finishes should be uniform without brush marks, roller marks, or coverage issues.
Ceiling systems in common areas require inspection for proper installation and finish quality. Check for any sagging panels, missing tiles, or damaged areas. Lighting fixtures should be properly mounted and operational.
Common area amenities like mailboxes, intercom systems, and access control devices should be tested for proper operation. These systems are essential for building security and resident convenience.
The building’s signage system should be complete and properly installed. This includes directional signs, floor numbers, apartment numbers, and safety signs. All signage should be legible and professionally installed.
Fire safety equipment in common areas needs verification. Fire extinguishers should be properly mounted, charged, and inspected. Emergency lighting should be functional, and exit signs should be illuminated and clearly visible.
Landscaping and outdoor common areas should be inspected for completion according to approved plans. Plants should be healthy and appropriate for the UAE climate. Irrigation systems should be operational and properly designed to conserve water while maintaining landscape health.
The overall cleanliness and maintenance of common areas reflects the developer’s attention to detail and the building management’s standards. These areas create first impressions for residents and visitors, making their condition particularly important for long-term property values.
Critical Interior Systems Evaluation

Electrical Systems and Safety Compliance Testing
Every property in the UAE must meet specific electrical standards set by Dubai Municipality and other emirate authorities. When conducting your snagging checklist UAE inspection, electrical systems deserve your closest attention since faulty wiring poses serious safety risks.
Start by examining the main electrical panel. Check that all circuit breakers are properly labeled with clear descriptions of what areas they control. The panel should be easily accessible and mounted at the correct height according to UAE regulations. Look for any signs of poor workmanship like loose wires, burn marks, or inadequate spacing between components.
Test every electrical outlet throughout the property using a simple outlet tester available from any hardware store. This device reveals common wiring problems like reversed polarity, missing ground connections, or faulty GFCI protection. Pay special attention to outlets near water sources in bathrooms and kitchens, which require GFCI protection under UAE electrical codes.
Light switches need thorough testing too. Flip each switch multiple times to ensure smooth operation without flickering or sparking sounds. Dimmer switches should adjust lighting levels gradually without buzzing or overheating. Check that all switches control the correct fixtures – developers sometimes wire switches to unexpected outlets or lights.
Safety Features to Verify:
- Residual Current Device (RCD) protection on all circuits
- Proper earthing connections throughout the property
- Smoke detector functionality and battery backup
- Emergency lighting in common areas and stairwells
- Fire alarm system integration where required
The electrical meter and connection point require inspection for proper sealing and tamper-evident installations. DEWA or your local utility should have approved and sealed these connections. Any signs of unauthorized modifications or bypasses represent serious safety violations.
External electrical components like outdoor lighting, pool equipment, and garage door openers need weatherproof installations with appropriate IP ratings for UAE climate conditions. Exposed wiring or inadequate protection against moisture leads to dangerous situations during the humid summer months.
Document any electrical defects with detailed photos showing the specific location and nature of each problem. Include the room, wall location, and type of issue in your notes. This documentation helps electricians understand exactly what needs correction and prevents disputes with developers about the scope of required repairs.
Plumbing Functionality and Leak Detection
Water damage ranks among the most expensive property problems, making plumbing inspection a critical component of any comprehensive snagging checklist UAE. The desert climate and water scarcity in the UAE make proper plumbing systems essential for long-term property value.
Begin your plumbing evaluation by testing water pressure throughout the property. Turn on multiple fixtures simultaneously to check for pressure drops that indicate undersized pipes or supply issues. Hot water should reach all fixtures within a reasonable timeframe – typically 30-60 seconds depending on distance from the water heater.
Systematic Fixture Testing:
- Run water at each sink for several minutes checking for leaks
- Test all faucet positions including temperature mixing
- Verify proper drainage without backup or slow flow
- Check for water stains or moisture damage around fixtures
- Inspect caulking and seals for gaps or deterioration
Toilet installations require careful inspection since improper mounting causes expensive floor damage. Check that each toilet sits firmly without rocking or movement. Flush multiple times while watching for leaks around the base. The toilet should refill properly without continuous running or inadequate water levels.
Shower and bathtub testing involves running water at full pressure while checking for leaks in surrounding walls and floors. Look for water stains on ceiling areas below bathrooms, which indicate hidden leaks in upper floor installations. Shower doors should seal properly without allowing water escape onto bathroom floors.
Water heater functionality affects daily comfort and energy costs. Test hot water temperature consistency and recovery time after heavy usage. The unit should maintain steady temperatures without dangerous overheating or inadequate heating capacity. Check that pressure relief valves are properly installed and drain lines direct water safely away from the unit.
Hidden Leak Detection Techniques:
- Monitor water meter readings with all fixtures turned off
- Check for damp spots or discoloration on walls and ceilings
- Listen for sounds of running water when no fixtures are active
- Use moisture meters on suspicious wall areas
- Inspect pipe access panels and utility closets for signs of moisture
External plumbing components like irrigation systems, pool equipment, and outdoor faucets need testing for proper operation and freeze protection. Even in the UAE’s warm climate, water pipes can experience thermal expansion issues that cause joint failures over time.
The main water shut-off valve location and operation require verification since emergency situations demand quick water supply disconnection. Make sure the valve operates smoothly and completely stops water flow when closed. Property managers and residents should know this valve’s location for emergency response.
Air Conditioning Performance and Efficiency Check
Air conditioning systems represent the largest energy expense for most UAE properties, making proper installation and performance testing essential elements of your snagging checklist UAE inspection. The extreme summer temperatures demand reliable cooling systems that operate efficiently year-round.
Start by examining the outdoor condensing units for proper installation and clearance requirements. Units need adequate airflow space on all sides according to manufacturer specifications. Check that refrigerant lines are properly insulated and secured against vibration damage. Electrical connections should be weatherproofed with appropriate conduit protection.
Indoor air handlers require inspection for secure mounting, proper drainage connections, and adequate access for maintenance. The condensate drain should flow freely without backup that could cause water damage. Air filters should be clean and properly sized for the specific unit model.
Performance Testing Protocol:
- Measure temperature differential between supply and return air
- Check airflow volume at each register and return vent
- Test thermostat accuracy and programming functions
- Verify proper refrigerant levels through system pressures
- Inspect ductwork for leaks, damage, or poor connections
- Evaluate insulation coverage on all accessible ductwork
Each room’s cooling performance needs individual assessment since improper ductwork design creates hot spots and uneven temperatures. Close all windows and doors, set thermostats to a reasonable temperature, and allow systems to operate for 30 minutes before measuring results.
Ductwork inspection reveals common installation problems that reduce efficiency and increase operating costs. Look for disconnected joints, crushed flexible ducts, or inadequate insulation coverage. Poorly sealed ductwork wastes enormous amounts of energy by conditioning spaces like wall cavities or ceiling areas instead of living spaces.
Fresh air ventilation systems require testing to ensure adequate outdoor air introduction without compromising energy efficiency. UAE building codes mandate specific ventilation rates for different occupancy types. Bathroom exhaust fans should operate quietly while providing sufficient air movement to prevent moisture problems.
Energy Efficiency Indicators:
- SEER ratings match specifications in purchase documents
- Programmable thermostats function properly with all features
- Zone control systems operate independently when installed
- Smart home integration works with building management systems
- Energy monitoring displays provide accurate consumption data
System controls and automation features need thorough testing since modern properties often include sophisticated building management systems. Verify that scheduled operations, temperature setbacks, and remote control functions operate as designed. Integration with home automation systems should provide reliable control without connectivity issues.
Noise levels from HVAC equipment can significantly impact living comfort. Outdoor units should operate within acceptable decibel limits for residential areas. Indoor equipment should run quietly without vibrations that transmit through building structures. Excessive noise often indicates installation problems or equipment defects.
Flooring and Wall Finish Quality Assessment
The quality of flooring and wall finishes directly impacts both property aesthetics and long-term maintenance costs. UAE properties often feature premium finishes that require careful inspection to identify installation defects or material quality issues that affect durability in the region’s challenging climate.
Tile installations demand meticulous examination since poor workmanship leads to cracking, loose tiles, and water damage. Check tile alignment, grout line consistency, and proper spacing throughout each room. Run your hand across tile surfaces to detect high or low spots that indicate uneven substrate preparation. Hollow-sounding tiles when tapped may indicate insufficient adhesive coverage.
Detailed Tile Inspection Points:
- Grout lines should be consistent width and properly sealed
- Edge transitions between different flooring types
- Tile cuts around fixtures and obstacles should be clean and straight
- Natural stone tiles require proper sealing against stains and moisture
- Large format tiles need perfect flatness to prevent cracking under load
Hardwood flooring assessment involves checking for proper acclimation, installation gaps, and finish quality. Wood floors in the UAE face unique challenges from humidity fluctuations and potential moisture infiltration. Look for boards that cup, crown, or separate at joints. Scratches, dents, or finish inconsistencies should be documented for correction before final acceptance.
Carpet installations require attention to seaming, stretching, and transition details. Walk across all carpeted areas feeling for wrinkles, loose areas, or inadequate padding. Carpet seams should be nearly invisible when properly installed. Check transitions between carpet and hard surfaces for secure attachment and appropriate height relationships.
Wall finish inspection covers paint quality, texture consistency, and surface preparation. Look for brush marks, roller stipple patterns, or color variations that indicate poor application techniques. Paint coverage should be uniform without showing primer or substrate colors underneath. Check corners and edges where different colors meet for clean, straight lines.
Paint and Wall Finish Defects to Document:
- Visible brush strokes or roller marks in final paint coats
- Color bleeding between adjacent paint colors
- Inadequate coverage showing substrate or primer
- Texture inconsistencies from poor spray application
- Stains or discoloration from water damage or improper preparation
Wallpaper installations need careful scrutiny for bubble formation, seam alignment, and pattern matching. Bubbles or loose areas indicate inadequate adhesive application or surface preparation. Seams should be tight and virtually invisible when viewed from normal distances. Complex patterns require precise alignment at seams and corners.
Drywall finish quality affects the entire room’s appearance since paint and wallpaper only highlight underlying surface defects. Check for nail pops, joint ridges, or surface scratches that show through finish materials. Interior corners should be straight and plumb while maintaining consistent reveals around doors and windows.
Natural stone installations require evaluation of color matching, surface finishing, and protective treatments. Stone surfaces should have consistent color and grain patterns within acceptable natural variation ranges. Polished surfaces need uniform reflection levels without dull spots or scratches. Sealed surfaces should repel water and resist staining.
Quality Benchmarks by Flooring Type:
| Flooring Type | Key Quality Indicators | Common Defects to Check |
|---|---|---|
| Ceramic Tile | Level surface, consistent grout, proper sealing | Hollow spots, uneven grout lines, cracked tiles |
| Natural Stone | Color consistency, proper sealing, smooth transitions | Staining, etching, uneven surfaces |
| Hardwood | Tight joints, smooth finish, proper acclimation | Gaps, cupping, finish scratches |
| Carpet | Tight seams, proper stretching, secure transitions | Wrinkles, loose areas, visible seams |
| Vinyl/LVT | Flat installation, secure edges, proper underlayment | Bubbles, lifting edges, visible substrate |
Baseboard and trim installations require inspection for proper fit, finish quality, and secure attachment. Joints should be tight and well-fitted with minimal caulking needed to fill gaps. Nail holes should be filled and sanded smooth before painting. Check that trim pieces follow wall contours without gaps that allow dust accumulation or pest entry.
The interaction between flooring and wall finishes at transition points needs careful evaluation. Different materials expand and contract at different rates, requiring proper expansion joints and flexible sealants. Rigid connections between dissimilar materials often crack or separate over time, especially in the UAE’s temperature variations between air-conditioned interiors and outdoor conditions.
Kitchen and Bathroom Specific Checkpoints
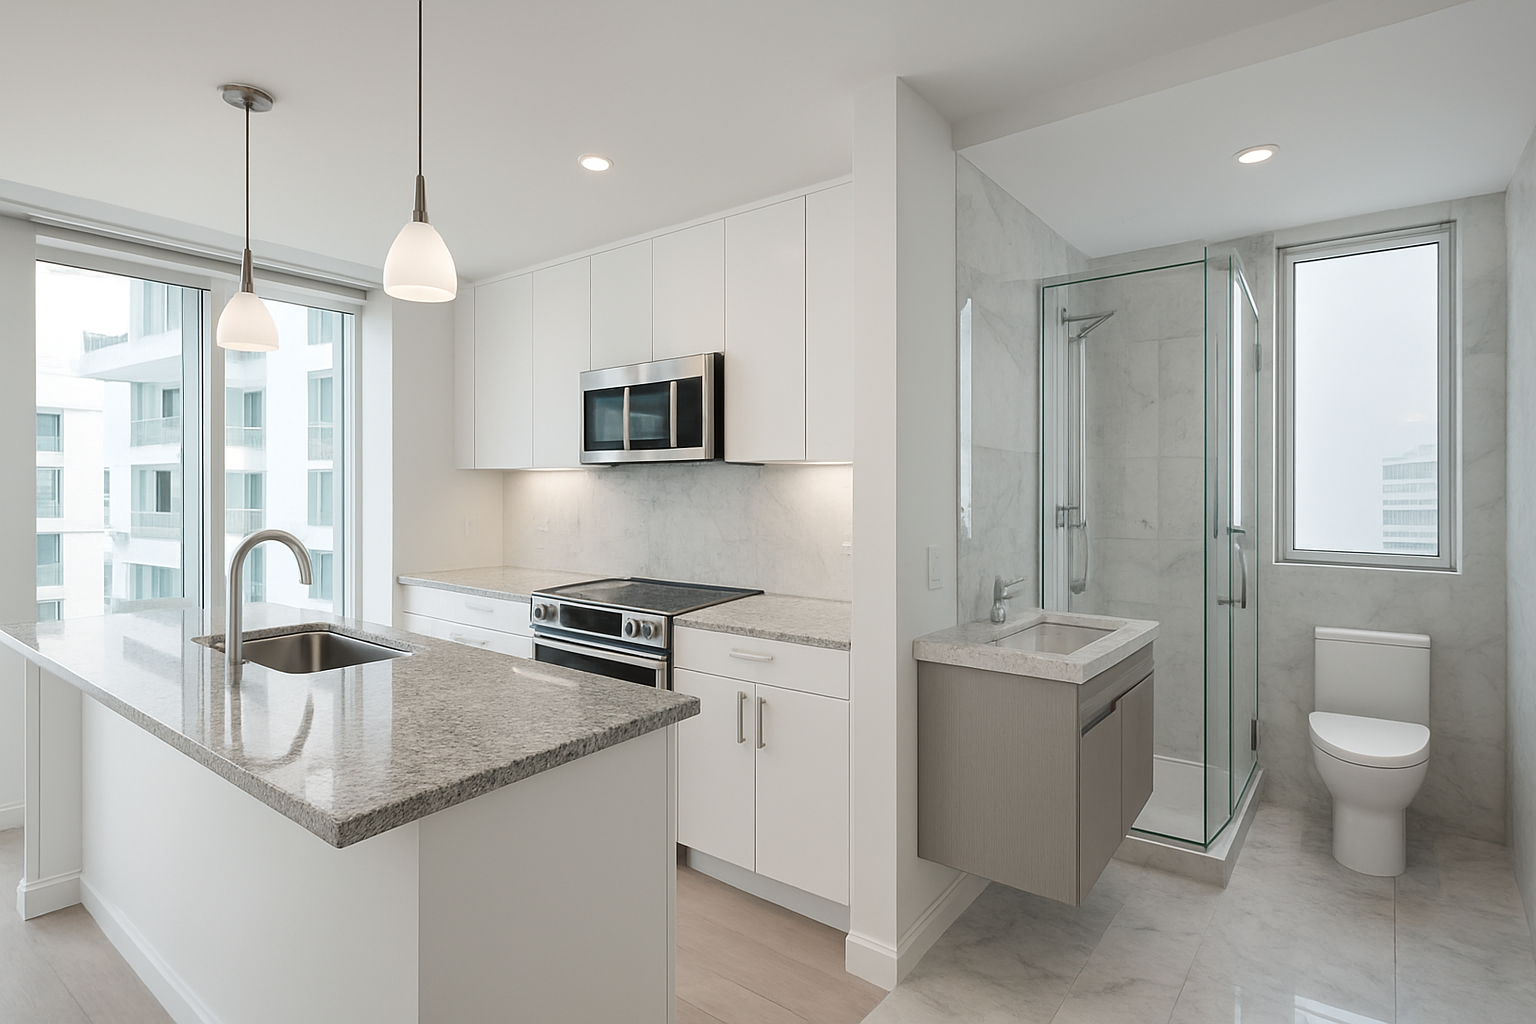
Cabinet Installation and Hardware Functionality
Checking cabinet installation quality can make or break your kitchen and bathroom experience. Start by examining the cabinet doors – they should close smoothly and align perfectly with each other. Open and close every single door multiple times to test the hinges. Quality hinges operate silently without squeaking or grinding sounds. If you hear metal-on-metal contact, the hinges need adjustment or replacement.
Look at the gaps between doors when closed. These should be consistent across all cabinets, typically around 2-3mm. Uneven gaps signal poor installation or warped cabinet boxes. Run your fingers along the door edges to feel for alignment issues your eyes might miss.
Drawer functionality deserves special attention. Pull each drawer completely out and push it back in. Soft-close mechanisms should engage gently without slamming. Test the weight capacity by placing moderate pressure on extended drawers – they shouldn’t sag or bind. Examine the drawer slides for smooth operation throughout their full range of motion.
Cabinet door handles and knobs need thorough testing too. Grab each handle firmly and try to wiggle it. Loose hardware indicates poor installation that will worsen over time. Check that all handles are positioned at the same height and distance from door edges. Misaligned hardware looks unprofessional and can be expensive to fix later.
Inspect the cabinet boxes themselves for structural integrity. Look inside each cabinet with a flashlight to spot any cracks, splits, or delamination in the materials. The interior surfaces should be smooth and properly finished. Check corner joints where cabinet sides meet – these should be tight with no visible gaps or loose connections.
Shelving deserves attention too. Adjustable shelves should move smoothly in their pin holes without excessive play. Fixed shelves need to sit level and feel solid when you apply downward pressure. Examine shelf edges for chips or rough spots that could damage stored items.
The cabinet mounting to walls requires verification. Gently try to move upper cabinets by pushing and pulling on the cabinet boxes (not the doors). Properly secured cabinets won’t budge. Base cabinets should sit flush against walls without gaps or rocking motion when you press on countertops.
Don’t forget to check cabinet lighting systems if installed. Test all interior LED strips or puck lights to ensure they illuminate evenly without dark spots. Light switches should operate smoothly and be positioned logically for easy access.
Appliance Integration and Performance Testing
Built-in appliances need seamless integration with surrounding cabinetry and flawless operation. Start with the dishwasher – open and close the door to verify it seals properly against the cabinet face. Run a complete wash cycle to test all functions including water fill, wash action, drainage, and heated drying. Listen for unusual noises during operation like grinding, squealing, or excessive vibration.
Check dishwasher installation details carefully. The unit should sit flush with surrounding cabinets without protruding or receding. Water supply and drain connections must be secure with no visible leaks. Test the door latch mechanism multiple times – it should engage positively without requiring excessive force.
Oven installation requires thorough inspection. Built-in ovens must fit snugly in their cabinet openings with proper ventilation clearances. Test all heating elements including main oven, broiler, and convection fan if equipped. Preheat the oven to maximum temperature and verify even heat distribution by observing how quickly different areas warm up.
Oven door operation deserves special attention. The door should open and close smoothly with positive detent positions. Door seals must make complete contact around the entire perimeter when closed. Interior lighting should illuminate evenly when the door opens. Test all control knobs and digital displays for proper response.
Cooktop installation and performance testing varies by type. Gas cooktops require checking each burner for consistent flame patterns and easy ignition. Electric cooktops need testing of all heating elements for even heat distribution and responsive controls. Induction cooktops should recognize compatible cookware and heat evenly across the cooking surface.
Range hood functionality impacts kitchen comfort significantly. Test all fan speeds to verify adequate airflow without excessive noise. Check that lights illuminate the cooking surface evenly. Grease filters should fit properly and remove easily for cleaning. External venting systems need verification that air actually exhausts outside rather than recirculating.
Microwave integration deserves careful attention in modern kitchens. Built-in microwaves should align perfectly with surrounding cabinetry. Test all power levels and cooking functions including turntable rotation if equipped. Door latches must engage securely while allowing easy opening with light pressure.
Refrigerator installation in built-in applications requires checking fit, finish, and function. The unit should sit flush with cabinet faces while maintaining proper ventilation clearances. Test all cooling zones to verify they reach proper temperatures. Ice makers and water dispensers need thorough testing for proper operation and leak-free connections.
Garbage disposal operation requires testing with water flow to check for proper grinding action and drainage. The unit should operate smoothly without excessive vibration or noise. Check the mounting assembly to ensure the disposal doesn’t sag or shift during operation.
Tile Work and Grout Quality Inspection
Tile installation quality significantly impacts both aesthetics and long-term durability. Begin your inspection by examining tile alignment across large surfaces. Use a straight edge or laser level to check that tile rows run straight and parallel. Even slight deviations become noticeable over time and indicate poor workmanship.
Grout lines deserve meticulous inspection throughout your snagging checklist UAE evaluation. All grout joints should maintain consistent width across the entire installation. Measure joint width with a ruler in multiple locations – variations greater than 1mm indicate sloppy installation. Grout should sit slightly below tile surfaces to prevent chipping while completely filling all joints.
Check grout color consistency carefully. Fresh grout sometimes appears uneven due to varying cure rates, but significant color variations suggest mixing problems or contamination. Run your finger along grout lines to feel for soft spots that indicate incomplete curing or incorrect mixing ratios.
Tile spacing around fixtures requires special attention. Cuts around toilets, sinks, and tub surrounds should follow consistent spacing patterns with clean, straight lines. Caulk joints between tile and fixtures must be neat and complete without gaps or excess material. Test caulk flexibility by pressing gently – it should compress and spring back without cracking.
Surface flatness across tile installations affects both appearance and function. Use a long straight edge to check for lippage where adjacent tiles don’t align perfectly. Excessive lippage creates cleaning difficulties and wear patterns. Professional installations typically keep lippage under 1mm for smooth tiles.
Hollow tiles indicate installation problems that can lead to cracking. Tap tiles systematically with a coin or small tool – solid installations produce sharp, clear sounds while hollow areas create dull, hollow sounds. Mark any hollow tiles for repair before accepting the installation.
Corner and edge details reveal installation quality clearly. Internal corners should show neat grout lines without excess material buildup. External corners need proper trim pieces or carefully mitered tile edges. Bullnose tiles must align properly with field tiles while maintaining consistent reveals.
Waterproofing verification is absolutely essential in wet areas. Check that tile installations extend appropriate distances up walls in shower areas – typically 6 feet minimum. Examine seam areas where walls meet floors or where different materials join. These transition areas should show proper sealing without gaps.
Tile pattern alignment demonstrates installer skill levels. Complex patterns like herringbone or basketweave should maintain consistent geometry throughout the installation. Pattern breaks at walls or obstacles should follow logical layout principles rather than creating awkward partial tiles in prominent locations.
Natural stone installations require additional inspection points. Stone tiles should show consistent color and grain patterns unless random variation was specified. Check for proper sealing – water drops should bead up rather than soaking into stone surfaces. Examine stone edges for chips or rough spots that need refinishing.
Mosaic tile installations present unique inspection challenges. Small tiles must maintain consistent spacing despite their size. Grout coverage should be complete without voids between individual pieces. Pre-mounted mosaic sheets should show proper alignment without visible backing materials through grout joints.
Movement joints in large tile installations prevent cracking from building settlement or thermal expansion. Check that expansion joints appear in appropriate locations like doorway transitions or large room centers. These joints should contain proper sealant materials rather than hard grout that would crack under stress.
Documentation and Developer Communication Process

Photographing and Recording All Defects Properly
When you spot defects during your property inspection, capturing them correctly makes the difference between getting issues resolved quickly or fighting endless battles with developers. Your photos serve as legal evidence, so taking them properly protects your investment and speeds up the repair process.
Camera Settings and Equipment
Your smartphone camera works fine for most documentation, but consider these settings for better results. Turn on the grid lines to help with composition and ensure your photos are straight. Use natural lighting whenever possible – those harsh LED ceiling lights can create shadows that hide important details. If you’re inspecting during evening hours, bring a portable LED light panel or high-powered flashlight to illuminate dark corners and crevices.
For detailed shots of small defects like paint chips or tile cracks, use your phone’s macro mode or get as close as the camera allows while maintaining focus. Take multiple shots from different angles – what looks minor in one photo might reveal significant damage when captured from another perspective.
Strategic Photo Documentation Approach
Start each room with wide-angle shots showing the overall condition, then move to medium shots of specific areas, and finish with close-up detailed photos of individual defects. This three-tier approach gives you comprehensive coverage and helps developers understand both the scope and specific nature of problems.
Label your photos immediately while taking them. Most phones allow you to add voice memos or text notes to images. Include the room name, defect type, and any relevant measurements. For example: “Master bedroom – water stain on ceiling – approximately 2 feet diameter” or “Kitchen – loose tile near sink – tiles move when pressed.”
Creating Comprehensive Defect Records
Beyond photos, create detailed written descriptions that paint a complete picture. Describe what you see, feel, hear, or smell related to each defect. A loose door handle isn’t just loose – document whether it rattles, if the mounting screws are visible, or if the entire mechanism moves when turned.
Measure defects whenever possible. Carry a small measuring tape during your inspection. Developers often downplay issues described as “small crack” but take “3-inch crack extending from floor to baseboard” more seriously. Measurements also help contractors prepare properly for repairs.
Use consistent terminology throughout your documentation. Research proper construction terms for common defects so your reports sound professional and leave no room for misinterpretation. A “gap between wall and ceiling” becomes more precise when described as “1/4-inch gap in crown molding joint at southwest corner.”
Video Documentation Benefits
While photos capture specific moments, videos show functionality issues that still images miss. Record doors opening and closing to demonstrate alignment problems, run water in sinks and showers to show drainage issues, and test light switches while recording to document electrical problems.
Walk-through videos provide context that individual photos can’t match. Start outside each room, announce the location clearly for the audio track, then pan slowly across the space before focusing on specific defects. This creates a logical flow that helps developers and contractors understand the relationship between different issues.
For mechanical systems, record both normal operation attempts and failure modes. Show yourself trying to adjust a window that won’t open properly, or demonstrate how a cabinet door won’t close flush. These videos become powerful evidence when developers claim everything works fine.
Creating Priority Lists for Immediate vs Future Fixes
Not all defects carry equal weight in your snagging checklist UAE documentation. Some issues demand immediate attention for safety or habitability reasons, while others can wait for more convenient scheduling. Creating smart priority lists helps you focus developer attention where it matters most and demonstrates your reasonable approach to problem-solving.
Safety-Critical Issues (Priority 1)
Electrical problems top every immediate action list. Exposed wiring, sparking outlets, non-functioning circuit breakers, or any situation where you smell burning or see scorch marks requires immediate professional attention. Don’t test questionable electrical components yourself – document them visually and request urgent inspection by qualified technicians.
Plumbing emergencies follow closely behind electrical issues. Active leaks, sewage backup, non-functioning main water shutoffs, or gas odors near appliances need immediate response. Even small leaks can cause extensive damage quickly in UAE’s humid climate, leading to mold growth and structural problems.
Structural concerns that affect building integrity demand prompt attention. Large cracks in walls or ceilings, sagging floors, loose railings on balconies or staircases, and broken or missing safety glass in doors and windows all pose immediate risks to occupants and visitors.
Security and Access Problems (Priority 2)
While not immediately life-threatening, security issues significantly impact your ability to safely occupy the property. Non-functioning door locks, broken window latches, damaged security systems, or compromised entry points leave your property vulnerable and should be addressed within the first week of occupancy.
Problems affecting basic habitability fall into this category too. Non-functioning heating or cooling systems, major plumbing fixture failures, or significant water infiltration issues make the property uncomfortable or unusable and warrant quick resolution.
Missing or damaged safety features like smoke detectors, fire extinguisher mounts, or emergency lighting systems require prompt attention to meet local safety codes and insurance requirements.
Functional Defects (Priority 3)
Issues that affect daily comfort and convenience but don’t pose safety risks can be scheduled for resolution within 30 days. These include minor plumbing problems like slow drains or dripping faucets, HVAC issues that don’t completely disable the system, and appliance problems that have workarounds.
Door and window adjustment issues, minor electrical problems like non-functioning outlets in non-critical locations, and cosmetic defects that don’t indicate underlying structural problems fit this category.
Cosmetic Issues (Priority 4)
Paint touch-ups, minor tile chips, small scratches on fixtures, and other aesthetic problems that don’t affect function or indicate serious underlying issues can be addressed during regular maintenance cycles or at mutually convenient times.
However, don’t automatically assume cosmetic issues are unimportant. Sometimes surface problems indicate deeper defects. A small paint bubble might reveal water damage behind the wall, or a tiny crack could be the visible sign of settling or structural movement.
Priority Assessment Criteria Table
| Priority Level | Response Timeframe | Typical Issues | Impact Assessment |
|---|---|---|---|
| 1 – Immediate | 24-48 hours | Electrical hazards, active leaks, structural damage | Safety risk, uninhabitable conditions |
| 2 – Urgent | 1 week | Security systems, HVAC failures, major fixtures | Security compromise, significant inconvenience |
| 3 – Standard | 30 days | Minor repairs, functional adjustments | Daily inconvenience, potential long-term issues |
| 4 – Cosmetic | 90 days | Paint, scratches, minor aesthetic issues | Visual appeal, minor inconvenience |
Submitting Snagging Reports Within Legal Timeframes
UAE property laws establish specific timeframes for reporting defects, and missing these deadlines can cost you thousands of dirhams in repair expenses. Understanding and meeting these legal requirements protects your rights as a buyer and ensures developers remain responsible for fixing legitimate construction defects.
Dubai Land Department Regulations
Dubai’s property regulations typically provide a one-year warranty period for structural defects and electrical/plumbing systems, but you must report non-conforming items within specific timeframes after handover. For most residential properties, you have 30 days to submit your initial snagging report documenting obvious defects visible during standard inspection.
Hidden defects that only become apparent after occupancy get different treatment under the law. These issues, such as internal pipe leaks or electrical problems that develop after moving in, can be reported throughout the warranty period, but you must demonstrate they result from construction defects rather than normal wear or misuse.
The clock starts ticking from your official handover date, not from when you first viewed the property or signed purchase agreements. Make sure you understand exactly when your reporting period begins and mark critical dates on your calendar with alerts set well in advance.
Abu Dhabi and Northern Emirates Variations
Other emirates have similar but not identical regulations regarding defect reporting timeframes. Abu Dhabi’s Department of Municipalities and Transport follows comparable guidelines but may have different specific requirements for documentation format or submission methods.
Sharjah, Ajman, and the northern emirates often defer to federal regulations while maintaining some local variations in enforcement and procedure. If your property lies outside Dubai, research the specific requirements for your emirate or consult with local real estate professionals familiar with regional practices.
Proper Submission Procedures
Submit your snagging report through official channels established by your developer. Most major developers have dedicated customer service departments that handle post-handover issues, complete with online portals for submitting reports and tracking progress.
Always retain copies of your submission confirmations and any correspondence reference numbers. Email submissions should request read receipts, and hand-delivered reports need signed acknowledgment copies. This documentation becomes critical if disputes arise later about whether you met reporting deadlines.
Include comprehensive contact information in your reports so developers can reach you easily to schedule repairs or request clarification. Provide multiple contact methods including phone, email, and WhatsApp numbers commonly used in UAE business communications.
Documentation Requirements for Legal Compliance
Your snagging report must meet certain standards to satisfy legal requirements. Include your property details such as plot number, building name, unit number, and handover date. Reference your sale agreement number and any relevant documentation from the handover process.
Organize defects by location and priority level, providing clear descriptions that any qualified contractor could understand and act upon. Avoid vague language like “poor quality finish” in favor of specific descriptions like “uneven grout lines with gaps exceeding 3mm in master bathroom shower area.”
Attach supporting evidence including photographs, videos, and any third-party inspection reports you’ve commissioned. Make sure all images are clearly labeled with locations and defect descriptions that match your written report.
Following Up on Developer Remediation Commitments
Getting developers to acknowledge defects represents just the first step in your snagging process. The real challenge lies in ensuring they follow through on repair commitments within reasonable timeframes and to acceptable quality standards. Effective follow-up strategies keep your case moving forward and prevent it from disappearing into administrative limbo.
Tracking Systems and Documentation
Create a systematic approach for monitoring each defect from initial reporting through final resolution. Spreadsheet tracking works well for most buyers, with columns for defect description, priority level, date reported, developer response, scheduled repair date, actual completion date, and quality assessment.
Take dated photos before and after each repair attempt. This documentation proves work was completed and helps identify cases where repairs created new problems or failed to fully address original issues. Some repairs look acceptable initially but fail shortly after completion, and having this photo timeline helps establish patterns of poor workmanship.
Maintain detailed records of all communications with developer representatives. Note the date, time, method of contact, person spoken with, and summary of discussion for every interaction. This creates an audit trail that proves your diligent follow-up efforts and can be valuable if legal intervention becomes necessary.
Communication Strategies That Work
Professional persistence gets better results than aggressive demands or emotional appeals. Approach each interaction as a business discussion aimed at resolving mutual concerns. Developers respond better to buyers who demonstrate understanding of construction processes while maintaining firm expectations for quality outcomes.
Schedule regular check-in calls or emails rather than waiting for developers to contact you with updates. Weekly follow-ups for high-priority items and bi-weekly contact for standard issues keeps your case active in their systems without becoming annoying.
Use multiple communication channels strategically. Email provides written documentation, phone calls allow for immediate clarification and relationship building, and WhatsApp messages offer quick updates and photo sharing capabilities popular in UAE business culture.
Escalation Procedures and Authority Levels
Understand your developer’s organizational structure so you can escalate issues appropriately when initial contacts fail to produce results. Start with customer service representatives, move to project managers, then to senior management if necessary. Each level has different authority to approve expedited repairs or compensation for delays.
Research the names and contact information for key decision-makers before you need them. LinkedIn, company websites, and industry publications often provide this information. Having direct access to senior executives gives you options when standard channels become unresponsive.
Document each escalation attempt and the reasons that made it necessary. This paper trail demonstrates your reasonable approach and good faith efforts to resolve issues through normal channels before seeking external assistance.
Quality Control and Re-inspection
Never accept repair work without thorough inspection. Contractors working under pressure to clear snagging lists sometimes complete work hastily or use temporary solutions that fail quickly. Test all functionality, check alignment and finish quality, and ensure repairs match the original specifications and surrounding areas.
Request advance notice before repair teams arrive so you can be present during work execution. This allows you to address questions immediately, ensure workers understand the specific requirements, and catch problems before teams leave the site.
If repairs prove unsatisfactory, document the deficiencies immediately and request rework rather than accepting substandard solutions. Quality standards don’t change just because an item appears on a snagging list, and you have the right to expect the same level of workmanship that should have been delivered initially.
Legal Remedies and Final Options
When developers consistently fail to address legitimate defects within reasonable timeframes, legal remedies become necessary. UAE’s Real Estate Regulatory Agency (RERA) provides dispute resolution services for buyers facing unresponsive developers, and these services are often more effective than attempting direct legal action.
Consider engaging qualified property lawyers who specialize in UAE real estate disputes. They understand local procedures, have relationships with regulatory authorities, and can often resolve issues through professional correspondence that carries more weight than individual buyer complaints.
Keep detailed records of all costs you incur due to developer delays or inadequate repairs. These might include temporary accommodation expenses, alternative repair costs, or compensation for extended inconvenience. Such documentation supports any legal claims for damages resulting from developer failures to meet their obligations.

Property snagging doesn’t have to feel overwhelming when you know what to look for. From checking exterior walls and drainage systems to testing electrical outlets and examining bathroom fixtures, having a systematic approach saves you time, money, and future headaches. The key is being thorough during your inspection and documenting everything with photos and detailed notes.
Remember to communicate directly with your developer about any issues you find. Most reputable developers in the UAE want to fix problems before handover, so don’t hesitate to point out defects during the snagging process. Your new home is a major investment, and taking the time to properly inspect it now means you’ll enjoy years of comfortable living without unexpected repair costs down the road.